
티스토리 뷰
1. Spring MVC에서 파일 업로드에 필요한 것
- 1 ) 파일 업로드 처리용 라이브러리 설정 ( pom.xml – dependency )
- 2 ) 스프링 설정 파일에서 Multipart Request를 핸들링 할 수 있는 Bean 설정 ( Servlet-context.xml )
- + spring-webmvc sub framework가 빈 클래스를 제공해 준다.
- + 이를 빈으로 등록하면, 이 Bean이 Multipart 처리를 위해 commons-fileupload 라이브러리를 이용한다.
2. 파일 업로드시 UUID를 사용하는 이유
- 1 ) 업로드된 파일을 저장할 시, 원본 파일명으로 저장해서는 안된다. (***)
- + 불특정 다수가 파일 업로드를 수행가능하기에, 원본 파일명이 동일하게 업로드 될 가능성이 존재한다.
- + 만약 동일원본파일명으로 파일을 다른 사람이 업로드할 경우, 기존에 업로드된 파일을 overwrite할 가능성이 있다.
- + 그렇기에 파일을 업로드 시, 각 파일을 UUID 기반의 파일명으로 저장해야 한다.
- 2 ) 파일 업로드 정보를 저장하는 테이블에는 적어도 아래의 3가지 정보 저장해야 된다.
- + [1] 원본 파일명 : 나중에 다운로드 처리시, 원본파일명으로 내려 받을 수 있도록 하기 위해서
- + [2] UUID기반의 실제 저장파일의 절대경로 ( ex. C:/Temp/upload/YYYYMMDD/UUID )
- + [3] Content-Type
[ 1. Spring MVC - 파일 업로드 ] (***)
[ 1 - 1. pom.xml 파일에서 파일 업로드 관련 dependency 추가하기 ]

[ + 코드 보기 ]
<?xml version="1.0" encoding="UTF-8"?>
 <!-- 1~2칸 띄우기 -->

<project
   xmlns="http://maven.apache.org/POM/4.0.0"
   xmlns:xsi="http://www.w3.org/2001/XMLSchema-instance"
   xsi:schemaLocation="http://maven.apache.org/POM/4.0.0 https://maven.apache.org/maven-v4_0_0.xsd">

   <modelVersion>4.0.0</modelVersion>

   <groupId>org.zerock</groupId>
   <artifactId>chap06</artifactId>
   <version>1.0.0-BUILD-SNAPSHOT</version>

   <!-- 웹에 패키징되는 건 war -->
   <packaging>war</packaging>

   <name>chap06</name>
   <url>http://chap06.example.com</url>
   <description>Spring MVC project - maven</description>


   <!-- 프로젝트 어디서든 가져다 쓸수 있도록 정의 -->
   <properties>

      <!-- 자바 버전 -->
      <java-version>11</java-version>
      <!-- <java-home>${env.JAVA_HOME}</java-home> -->

      <!-- <project.build.sourceEncoding>UTF-8</project.build.sourceEncoding>
      <maven.compiler.source>11</maven.compiler.source>
      <maven.compiler.target>11</maven.compiler.target> -->

      <!-- 스프링 프레임 워크 버전 -->
      <org.springframework-version>5.3.21</org.springframework-version>

      <org.aspectj-version>1.9.9.1</org.aspectj-version>
      <org.apache.logging.log4j-version>2.17.2</org.apache.logging.log4j-version>
   </properties>


   <dependencies>

      <!-- =============== Logging =============== -->

      <dependency>
         <groupId>org.apache.logging.log4j</groupId>
         <artifactId>log4j-core</artifactId>
         <version>${org.apache.logging.log4j-version}</version>
      </dependency>

      <!-- For Spring framework, HikariCP, DriverSpy logging -->
      <dependency>
         <groupId>org.apache.logging.log4j</groupId>
         <artifactId>log4j-slf4j-impl</artifactId>
         <version>${org.apache.logging.log4j-version}</version>
      </dependency>


      <!-- ============= Servlet/JSP ============= -->
      <!-- 이에 따라서 선택해야 하는 톰켓 버전이 달라질 수 있다. -->

      <dependency>
         <groupId>javax.servlet</groupId>
         <artifactId>javax.servlet-api</artifactId>
         <version>4.0.1</version>
         <scope>provided</scope>
      </dependency>

      <dependency>
         <groupId>javax.servlet.jsp</groupId>
         <artifactId>javax.servlet.jsp-api</artifactId>
         <version>2.3.3</version>
         <scope>provided</scope>
      </dependency>

      <dependency>
         <groupId>javax.servlet</groupId>
         <artifactId>jstl</artifactId>
         <version>1.2</version>
      </dependency>


      <!-- =============== AspectJ (스프링할 때 rt, weaver 꼭)=============== -->

      <dependency>
         <groupId>org.aspectj</groupId>
         <artifactId>aspectjrt</artifactId> <!-- rt = runtime -->
         <version>${org.aspectj-version}</version>
      </dependency>

      <dependency>
         <groupId>org.aspectj</groupId>
         <artifactId>aspectjweaver</artifactId>
         <version>${org.aspectj-version}</version>
      </dependency>


      <!-- ================ Spring (밑의 2개는 최소한 꼭) =============== -->

      <!-- spring bean container -->
      <dependency>
         <groupId>org.springframework</groupId>
         <artifactId>spring-context</artifactId>
         <version>${org.springframework-version}</version>
      </dependency>

      <!-- spring mvc 구동 -->
      <dependency>
         <groupId>org.springframework</groupId>
         <artifactId>spring-webmvc</artifactId>
         <version>${org.springframework-version}</version>
      </dependency>

      <!-- spring test -->
      <dependency>
         <groupId>org.springframework</groupId>
         <artifactId>spring-test</artifactId>
         <version>${org.springframework-version}</version>
         <scope>test</scope>
      </dependency>

      <!-- spring-jdbc -->
      <dependency>
         <groupId>org.springframework</groupId>
         <artifactId>spring-jdbc</artifactId>
         <version>5.3.21</version>
      </dependency>

      <!-- spring-tx manager -->
      <!-- X/Open XA 규약대로 모든 TX Manager가 구현되어 있다. -->
      <!-- 1. WAS 2. Spring MVC 3. JDBC Driver 4. Database Instance 안에 구현체가 있다. -->
      <dependency>
         <groupId>org.springframework</groupId>
         <artifactId>spring-tx</artifactId>
         <version>5.3.21</version>
      </dependency>

      <!-- =============== JDBC =============== -->

      <dependency>
         <groupId>org.bgee.log4jdbc-log4j2</groupId>
         <artifactId>log4jdbc-log4j2-jdbc4</artifactId>
         <version>1.16</version>
      </dependency>

      <dependency>
         <groupId>com.oracle.database.jdbc</groupId>
         <artifactId>ojdbc8-production</artifactId>
         <version>21.5.0.0</version>

         <type>pom</type>

         <exclusions>
            <exclusion>
               <groupId>com.oracle.database.ha</groupId>
               <artifactId>simplefan</artifactId>
            </exclusion>

            <exclusion>
               <groupId>com.oracle.database.ha</groupId>
               <artifactId>ons</artifactId>
            </exclusion>

            <exclusion>
               <groupId>com.oracle.database.jdbc</groupId>
               <artifactId>rsi</artifactId>
            </exclusion>

            <exclusion>
               <groupId>com.oracle.database.jdbc</groupId>
               <artifactId>ucp</artifactId>
            </exclusion>

            <exclusion>
               <groupId>com.oracle.database.xml</groupId>
               <artifactId>xdb</artifactId>
            </exclusion>

            <exclusion>
               <groupId>com.oracle.database.xml</groupId>
               <artifactId>xmlparserv2</artifactId>
            </exclusion>
         </exclusions>
      </dependency>


      <!-- =============== Testing (버전 4,5 둘다 쓸줄알아야함)=============== -->

      <dependency>
         <groupId>org.junit.jupiter</groupId>
         <artifactId>junit-jupiter-api</artifactId>
         <version>5.8.2</version>
         <scope>test</scope>
      </dependency>

      <!-- ================ DataSource ================= -->

      <!-- HikariCP -->
      <dependency>
         <groupId>com.zaxxer</groupId>
         <artifactId>HikariCP</artifactId>
         <version>5.0.1</version>

         <!-- 이 부분만 뺀다 -->
         <exclusions>
            <exclusion>
               <groupId>org.slf4j</groupId>
               <artifactId>slf4j-api</artifactId>
            </exclusion>
         </exclusions>

      </dependency>

      <!-- ================ MyBatis ================= -->
      <dependency>
			<groupId>org.mybatis</groupId>
			<artifactId>mybatis</artifactId>
			<version>3.5.10</version>
		</dependency>

      <!-- 마이바티스와 스프링 연동 라이브러리 -->
      <dependency>
         <groupId>org.mybatis</groupId>
         <artifactId>mybatis-spring</artifactId>
         <version>2.0.7</version>
      </dependency>

      <!-- ================ Data-Binding ================= -->

      <!-- Java 객체를 JSON으로 변환시켜 준다. -->
      <dependency>
         <groupId>com.fasterxml.jackson.core</groupId>
         <artifactId>jackson-databind</artifactId>
         <version>2.13.3</version>
      </dependency>

      <!-- Java 객체를 XML로 변환해 준다. -->
      <dependency>
         <groupId>com.fasterxml.jackson.dataformat</groupId>
         <artifactId>jackson-dataformat-xml</artifactId>
         <version>2.13.3</version>
      </dependency>

      <!-- ================ File - upload ================= -->

      <dependency>
         <groupId>commons-fileupload</groupId>
         <artifactId>commons-fileupload</artifactId>
         <version>1.4</version>
      </dependency>

      <!-- ================ Misc ================= -->

      <dependency>
         <groupId>javax.inject</groupId>
         <artifactId>javax.inject</artifactId>
         <version>1</version>
      </dependency>

      <!-- 롬복 -->
      <dependency>
         <groupId>org.projectlombok</groupId>
         <artifactId>lombok</artifactId>
         <version>1.18.24</version>
         <scope>provided</scope>
      </dependency>

   </dependencies>


    <build>

      <finalName>/</finalName>

        <plugins>

            <plugin>
            <groupId>org.apache.maven.plugins</groupId>
            <artifactId>maven-war-plugin</artifactId>
            <version>3.3.2</version>
            </plugin>

            <plugin>
            <groupId>org.apache.maven.plugins</groupId>
            <artifactId>maven-eclipse-plugin</artifactId>
            <version>2.10</version>

                <configuration>
                    <downloadSources>true</downloadSources>
                    <downloadJavadocs>false</downloadJavadocs>
                </configuration>
            </plugin>

            <plugin>
               <groupId>org.apache.maven.plugins</groupId>
               <artifactId>maven-compiler-plugin</artifactId>
               <version>3.10.1</version>

               <configuration>
                  <release>${java-version}</release>
               </configuration>
            </plugin>

        </plugins>

    </build>

</project>
[ 1 - 2. servlet-context.xml 파일에서 Bean 등록 ]

[ + 코드 보기 ]
<?xml version="1.0" encoding="UTF-8"?>

<beans:beans xmlns="http://www.springframework.org/schema/mvc"
	xmlns:xsi="http://www.w3.org/2001/XMLSchema-instance"
	xmlns:beans="http://www.springframework.org/schema/beans"
	xmlns:context="http://www.springframework.org/schema/context"
	xsi:schemaLocation="http://www.springframework.org/schema/mvc https://www.springframework.org/schema/mvc/spring-mvc.xsd
		http://www.springframework.org/schema/beans https://www.springframework.org/schema/beans/spring-beans.xsd
		http://www.springframework.org/schema/context https://www.springframework.org/schema/context/spring-context.xsd">

	<!-- DispatcherServlet Context: defines this servlet's request-processing infrastructure -->

	<!-- Enables the Spring MVC @Controller programming model -->
	<annotation-driven />

	<!-- Handles HTTP GET requests for /resources/** by efficiently serving up static resources in the ${webappRoot}/resources directory -->
	<!-- /resources/**의 의미는 resources폴더 아래에 있는 어떠한(모든) 자원을 의미한다. -->
	<!-- < resources mapping location >의 경우 파일을 생성하여 매핑할 수 있으며, 같은 location이여도 mapping을 추가할 수 있다. -->
	<!-- 설정파일을 수정하였으면, WAS를 내렸다가 올려야 한다. -->
	<!-- 아래의 태그로 인해 URL mapping처럼 http://localhost:8080/resources/파일명으로 접근이 가능하다. -->
	<resources mapping="/resources/**" location="/resources/" />

	<!-- Resolves views selected for rendering by @Controllers to .jsp resources in the /WEB-INF/views directory -->
	<!-- View로 어떤 JSP가 사용되어야 하는지 알려준다. -->
	<!-- ViewResolver는 MVC 패턴에서 Model 데이터를 이용하여 최종 응답화면을 생성할 View 역할을 수행할 대상을 찾아낸다. -->

	<!-- [ 예전 버전 ] -->
	<!-- + 예전 버전은 빈으로 등록하는 방법을 사용했다. -->
	<!-- <beans:bean class="org.springframework.web.servlet.view.InternalResourceViewResolver"> -->
		<!-- beans:property는 setPrefix와 setSuffix를 value값으로 해주는것이다. -->
		<!-- <beans:property name="prefix" value="/WEB-INF/views/" /> -->
		<!-- <beans:property name="suffix" value=".jsp" /> -->
	<!-- </beans:bean> -->

	<!-- [ 현재 버전 ] -->
	<!-- View Resolver -->
	<view-resolvers>
		<jsp prefix="/WEB-INF/views/" suffix=".jsp" />
	</view-resolvers>

	<!-- 단순 View 호출을 위한 설정 -->
	<!-- path = 전체 URI 지정 -->
	<!-- view-name = 보여줄 jsp 명 -->
	<view-controller path="/sample2/getsample" view-name="sample" status-code="200" />

	<!-- 파일 업로드 -->
	<beans:bean id="multipartResolver" class="org.springframework.web.multipart.commons.CommonsMultipartResolver">
		<beans:property name="defaultEncoding" value="utf8" />
		<!-- 최대 10mb까지 업로드 가능 -->
		<beans:property name="maxInMemorySize" value="10485760" />
		<beans:property name="maxUploadSize" value="10485760" />
		<!-- 파일 1개당 최대 사이즈는 2mb로 제한 -->
		<beans:property name="maxUploadSizePerFile" value="2097152" />
		<!-- 파일의 이름을 저장할지 지정 -->
		<beans:property name="preserveFilename" value="true" />
		<!-- 업로드할 정소 지정 -->
		<!-- 로컬에서는 경로를 file:///로 시작해야 한다. -->
		<beans:property name="uploadTempDir" value="file:///C:/Temp/upload" />
	</beans:bean>

	<!-- base-package에 작성한 패키지 내에 있는 것을 빈으로 등록시킨다. -->
	<context:component-scan base-package="org.zerock.myapp.controller" />

</beans:beans>
[ 1 - 3. Controller - handler 생성 ]


[ + 코드 보기 ]
package org.zerock.myapp.controller;
import java.io.BufferedInputStream;
import java.io.BufferedOutputStream;
import java.io.File;
import java.io.FileOutputStream;
import java.io.IOException;
import java.io.InputStream;
import java.util.List;
import org.springframework.stereotype.Controller;
import org.springframework.ui.Model;
import org.springframework.web.bind.annotation.GetMapping;
import org.springframework.web.bind.annotation.PostMapping;
import org.springframework.web.bind.annotation.RequestMapping;
import org.springframework.web.multipart.MultipartFile;
import lombok.NoArgsConstructor;
import lombok.NonNull;
import lombok.extern.log4j.Log4j2;
@Log4j2
@NoArgsConstructor
@RequestMapping("/fileupload/*") // 기본 URI
@Controller
public class FileUploadController {
// ================================================
// 1. 파일 업로드 화면 요청 핸들러 메소드
// ================================================
@GetMapping("page") // 상세 URI
public void page() {
log.trace("page() invoked.");
// + void의 경우에는 view의 이름이 기본 + 상세 URI로 자동호출된다.
// + 이와 같이 단순하게 view를 띄우는 것은 servlet-context.xml파일에서 지정할 수도 있으나
// + 그렇게 처리할 경우 @RequestMapping에서 Mapping table로 관리가 불가능하기에 지양해야 한다.
} // page
// ================================================
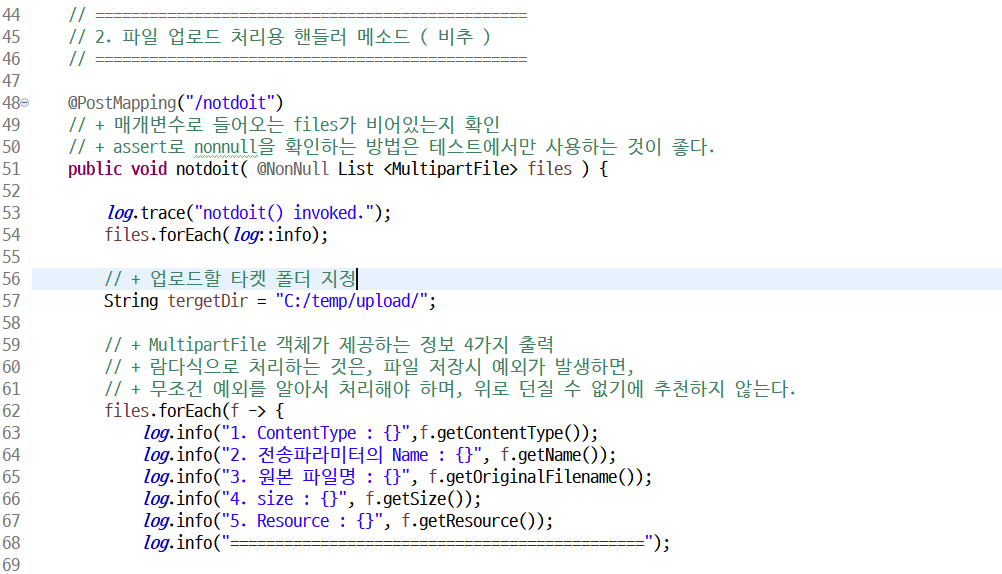
// 2. 파일 업로드 처리용 핸들러 메소드 ( 비추 )
// ================================================
@PostMapping("/notdoit")
// + 매개변수로 들어오는 files가 비어있는지 확인
// + assert로 nonnull을 확인하는 방법은 테스트에서만 사용하는 것이 좋다.
public void notdoit( @NonNull List <MultipartFile> files ) {
log.trace("notdoit() invoked.");
files.forEach(log::info);
// + 업로드할 타켓 폴더 지정
String tergetDir = "C:/temp/upload/";
// + MultipartFile 객체가 제공하는 정보 4가지 출력
// + 람다식으로 처리하는 것은, 파일 저장시 예외가 발생하면,
// + 무조건 예외를 알아서 처리해야 하며, 위로 던질 수 없기에 추천하지 않는다.
files.forEach(f -> {
log.info("1. ContentType : {}",f.getContentType());
log.info("2. 전송파라미터의 Name : {}", f.getName());
log.info("3. 원본 파일명 : {}", f.getOriginalFilename());
log.info("4. size : {}", f.getSize());
log.info("5. Resource : {}", f.getResource());
log.info("==============================================");
// + 업로드된 파일을 target 디렉토리에 저장
if ( f.getSize() > 0 ) {
// + C:/temp/upload/ + 원본 파일명 -> C:/temp/upload/ 밑에 파일로 저장한다는 의미
File targetFile = new File(tergetDir + f.getOriginalFilename());
try {
f.transferTo(targetFile);
} catch ( IllegalStateException | IOException e ) {
e.printStackTrace();
} // try - catch
} // if : 파일 업로드 된 것만 저장
}); // files.forEach
} // notdoit
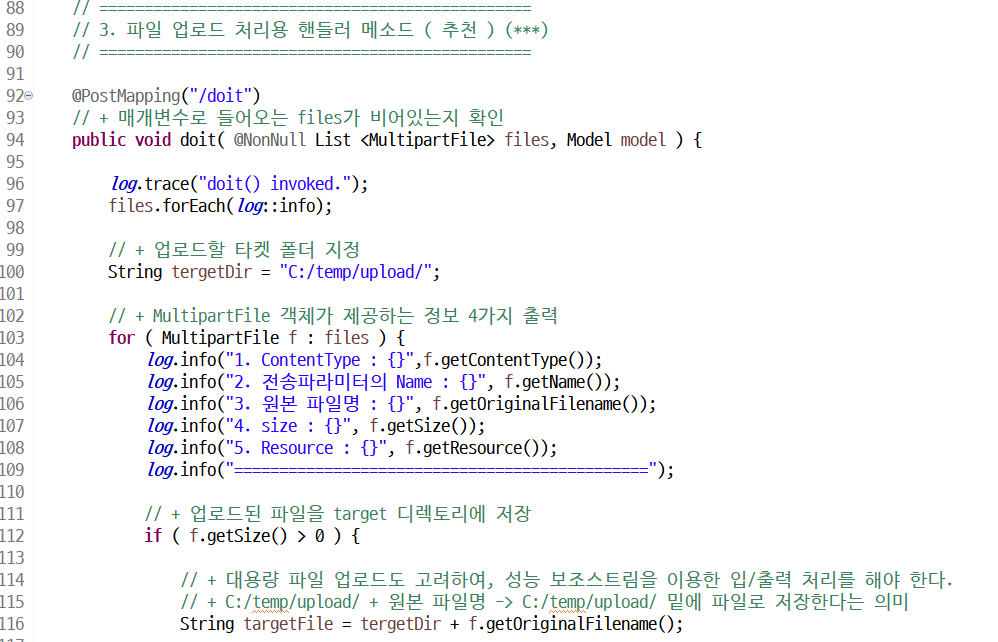
// ================================================
// 3. 파일 업로드 처리용 핸들러 메소드 ( 추천 ) (***)
// ================================================
@PostMapping("/doit")
// + 매개변수로 들어오는 files가 비어있는지 확인
public void doit( @NonNull List <MultipartFile> files, Model model ) {
log.trace("doit() invoked.");
files.forEach(log::info);
// + 업로드할 타켓 폴더 지정
String tergetDir = "C:/temp/upload/";
// + MultipartFile 객체가 제공하는 정보 4가지 출력
for ( MultipartFile f : files ) {
log.info("1. ContentType : {}",f.getContentType());
log.info("2. 전송파라미터의 Name : {}", f.getName());
log.info("3. 원본 파일명 : {}", f.getOriginalFilename());
log.info("4. size : {}", f.getSize());
log.info("5. Resource : {}", f.getResource());
log.info("==============================================");
// + 업로드된 파일을 target 디렉토리에 저장
if ( f.getSize() > 0 ) {
// + 대용량 파일 업로드도 고려하여, 성능 보조스트림을 이용한 입/출력 처리를 해야 한다.
// + C:/temp/upload/ + 원본 파일명 -> C:/temp/upload/ 밑에 파일로 저장한다는 의미
String targetFile = tergetDir + f.getOriginalFilename();
try {
InputStream is = f.getInputStream();
BufferedInputStream bis = new BufferedInputStream(is);
FileOutputStream fos = new FileOutputStream(targetFile);
BufferedOutputStream bos = new BufferedOutputStream(fos);
// + 자원 해제
// + @Cleanup을 통해 닫아줄 수도 있으나,
// + @Cleanup은 닫는 순서를 지켜주지 않는다.
try ( is; bis; fos; bos; ) {
// + 바가지 생성
byte [] buf = new byte[300];
int readBytes = 0;
while ( ( readBytes = bis.read(buf) ) != -1 ) { // EOF
bos.write(buf, 0, readBytes);
} // while
bos.flush();
} // try - with - resources
// + Model 객체에 성공의 유무를 확인하는 데이터 바인딩
model.addAttribute("__RESULT__", "SUCCESS");
} catch (IOException e) {
e.printStackTrace();
// + Model 객체에 성공의 유무를 확인하는 데이터 바인딩
model.addAttribute("__RESULT__", "partially Failed.");
} // try - catch
} // if : 파일 업로드 된 것만 저장
} // enhanced for
} // doit
} // end class
[ 1 - 4. View 생성 ]
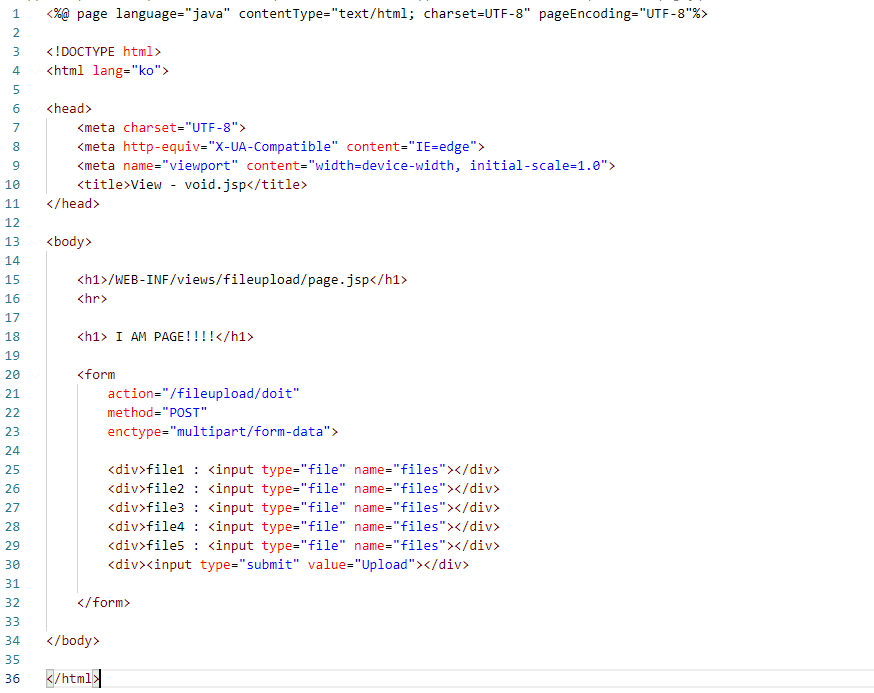
[ + 코드 보기 ]
<%@ page language="java" contentType="text/html; charset=UTF-8" pageEncoding="UTF-8"%>

<!DOCTYPE html>
<html lang="ko">

<head>
    <meta charset="UTF-8">
    <meta http-equiv="X-UA-Compatible" content="IE=edge">
    <meta name="viewport" content="width=device-width, initial-scale=1.0">
    <title>View - void.jsp</title>
</head>

<body>

    <h1>/WEB-INF/views/fileupload/page.jsp</h1>
    <hr>

    <h1> I AM PAGE!!!!</h1>

    <form
        action="/fileupload/doit"
        method="POST"
        enctype="multipart/form-data">

        <div>file1 : <input type="file" name="files"></div>
        <div>file2 : <input type="file" name="files"></div>
        <div>file3 : <input type="file" name="files"></div>
        <div>file4 : <input type="file" name="files"></div>
        <div>file5 : <input type="file" name="files"></div>
        <div><input type="submit" value="Upload"></div>

    </form>

</body>

</html>
[ + 코드 보기 ]
<%@ page language="java" contentType="text/html; charset=UTF-8" pageEncoding="UTF-8"%>

<!DOCTYPE html>
<html lang="ko">

<head>
    <meta charset="UTF-8">
    <meta http-equiv="X-UA-Compatible" content="IE=edge">
    <meta name="viewport" content="width=device-width, initial-scale=1.0">
    <title>View - doit.jsp</title>
</head>

<body>

    <h1>/WEB-INF/views/fileupload/doit.jsp</h1>
    <hr>

    <h1> I AM DOIT!!!!</h1>

    <h3>File Upload Result : ${__RESULT__}</h3>

</body>

</html>
[ 2. UUID 사용 version ] (****)


[ + 코드 보기 ]
package org.zerock.myapp.controller;

import java.io.BufferedInputStream;
import java.io.BufferedOutputStream;
import java.io.File;
import java.io.FileOutputStream;
import java.io.IOException;
import java.io.InputStream;
import java.security.NoSuchAlgorithmException;
import java.text.SimpleDateFormat;
import java.util.Date;
import java.util.List;

import org.springframework.stereotype.Controller;
import org.springframework.ui.Model;
import org.springframework.web.bind.annotation.GetMapping;
import org.springframework.web.bind.annotation.PostMapping;
import org.springframework.web.bind.annotation.RequestMapping;
import org.springframework.web.multipart.MultipartFile;
import org.zerock.uuid.UUIDGenerator;

import lombok.NoArgsConstructor;
import lombok.NonNull;
import lombok.extern.log4j.Log4j2;


@Log4j2
@NoArgsConstructor

@RequestMapping("/fileupload/*") // 기본 URI
@Controller
public class FileUploadController {

	// ================================================
	// 1. 파일 업로드 화면 요청 핸들러 메소드
	// ================================================

	@GetMapping("page") // 상세 URI
	public void page() {

		log.trace("page() invoked.");
		// + void의 경우에는 view의 이름이 기본 + 상세 URI로 자동호출된다.
		// + 이와 같이 단순하게 view를 띄우는 것은 servlet-context.xml파일에서 지정할 수도 있으나
		// + 그렇게 처리할 경우 @RequestMapping에서 Mapping table로 관리가 불가능하기에 지양해야 한다.

	} // page

	// ================================================
	// 2. 파일 업로드 처리용 핸들러 메소드 ( 비추 )
	// ================================================

	@PostMapping("/notdoit")
	// + 매개변수로 들어오는 files가 비어있는지 확인
	// + assert로 nonnull을 확인하는 방법은 테스트에서만 사용하는 것이 좋다.
	public void notdoit( @NonNull List <MultipartFile> files ) {

		log.trace("notdoit() invoked.");
		files.forEach(log::info);

		// + 업로드할 타켓 폴더 지정
		String tergetDir = "C:/temp/upload/";

		// + MultipartFile 객체가 제공하는 정보 4가지 출력
		// + 람다식으로 처리하는 것은, 파일 저장시 예외가 발생하면,
		// + 무조건 예외를 알아서 처리해야 하며, 위로 던질 수 없기에 추천하지 않는다.
		files.forEach(f -> {
			log.info("1. ContentType : {}",f.getContentType());
			log.info("2. 전송파라미터의 Name : {}", f.getName());
			log.info("3. 원본 파일명 : {}", f.getOriginalFilename());
			log.info("4. size : {}", f.getSize());
			log.info("5. Resource : {}", f.getResource());
			log.info("==============================================");

			// + 업로드된 파일을 target 디렉토리에 저장
			if ( f.getSize() > 0 ) {

				// + C:/temp/upload/ + 원본 파일명 -> C:/temp/upload/ 밑에 파일로 저장한다는 의미
				File targetFile = new File(tergetDir + f.getOriginalFilename());

				try {
					f.transferTo(targetFile);
				} catch ( IllegalStateException | IOException e ) {
					e.printStackTrace();
				} // try - catch

			} // if : 파일 업로드 된 것만 저장

		}); // files.forEach

	} // notdoit

	// ================================================
	// 3. 파일 업로드 처리용 핸들러 메소드 ( 추천 ) (***)
	// ================================================

	@PostMapping("/doit")
	// + 매개변수로 들어오는 files가 비어있는지 확인
	public void doit( @NonNull List <MultipartFile> files, Model model ) {

		log.trace("doit() invoked.");
		files.forEach(log::info);

		// + 업로드할 타켓 폴더 지정
		String tergetDir = "C:/Temp/upload/";

		// ================================================
		// + UUID 사용 ver 2
		// + tergetDir 경로 밑에 현재 날짜 폴더를 만든 후, 그 밑에 업로드 파일을 저장해라

		// + Date 객체 생성
		Date date = new Date();

		// + Date 객체를 yyyymmdd로 포멧팅한다.
		// + /를 넣어서 경로 구분자를 만들어 줘야 한다.
		SimpleDateFormat sdf = new SimpleDateFormat("yyyyMMdd/");
		String dateFile = sdf.format(date);

		// + tergetDir에 현재 날짜를 붙여서 파일 생성
		tergetDir += dateFile;
		File uploadDir = new File(tergetDir);

		// + 파일이 없으면 생성
		if ( !uploadDir.exists() ) {
			uploadDir.mkdir();
		} // if
		// ================================================

		// + MultipartFile 객체가 제공하는 정보 4가지 출력
		for ( MultipartFile f : files ) {
			log.info("1. ContentType : {}",f.getContentType());
			log.info("2. 전송파라미터의 Name : {}", f.getName());
			log.info("3. 원본 파일명 : {}", f.getOriginalFilename());
			log.info("4. size : {}", f.getSize());
			log.info("5. Resource : {}", f.getResource());
			log.info("==============================================");

			// + 업로드된 파일을 target 디렉토리에 저장
			if ( f.getSize() > 0 ) {

				// + 대용량 파일 업로드도 고려하여, 성능 보조스트림을 이용한 입/출력 처리를 해야 한다.
				// + C:/temp/upload/ + 원본 파일명 -> C:/temp/upload/ 밑에 파일로 저장한다는 의미
				// + 원본 파일명 사용한 ver
				// String targetFile = tergetDir + f.getOriginalFilename();

				try {

					// ================================================
					// + UUID 사용 ver
					// + C:/temp/upload/ + UUID -> C:/temp/upload/ 밑에 파일로 저장한다는 의미
					// String targetFile = tergetDir + UUIDGenerator.generateUniqueKeysWithUUIDAndMessageDigest();
					// ================================================
					// + UUID 사용 ver 2
					// + tergetDir 경로 밑에 현재 날짜 폴더를 만든 후, 그 밑에 업로드 파일을 저장해라

					String targetFile = tergetDir + UUIDGenerator.generateUniqueKeysWithUUIDAndMessageDigest();
					// ================================================

					InputStream is = f.getInputStream();
					BufferedInputStream bis = new BufferedInputStream(is);

					FileOutputStream fos = new FileOutputStream(targetFile);
					BufferedOutputStream bos = new BufferedOutputStream(fos);

					// + 자원 해제
					// + @Cleanup을 통해 닫아줄 수도 있으나,
					// + @Cleanup은 닫는 순서를 지켜주지 않는다.
					try ( is; bis; fos; bos; ) {

						// + 바가지 생성
						byte [] buf = new byte[300];

						int readBytes = 0;
						while ( ( readBytes = bis.read(buf) ) != -1 ) { // EOF
							bos.write(buf, 0, readBytes);
						} // while

						bos.flush();

					} // try - with - resources

					// + Model 객체에 성공의 유무를 확인하는 데이터 바인딩
					model.addAttribute("__RESULT__", "SUCCESS");

				} catch (IOException | NoSuchAlgorithmException e ) {
					e.printStackTrace();

					// + Model 객체에 성공의 유무를 확인하는 데이터 바인딩
					model.addAttribute("__RESULT__", "partially Failed.");
				} // try - catch

			} // if : 파일 업로드 된 것만 저장

		} // enhanced for

	} // doit


} // end class
'KH 정보교육원 [ Java ]' 카테고리의 다른 글
| KH 115일차 - Spring ( 게시판 만들기 ) (*****) (0) | 2022.08.10 |
|---|---|
| KH 114일차 - Spring ( Controller - 예외처리 / 게시판 만들기 ) (*****) (0) | 2022.08.09 |
| KH 112일차 - Spring ( Controller ) (****) (0) | 2022.08.05 |
| KH 111일차 - Spring ( Spring MVC - Controller ) (*****) (0) | 2022.08.04 |
| KH 110일차 - Spring ( Spring MVC ) (****) (0) | 2022.08.03 |